Recent Updates Page 8 Toggle Comment Threads | Keyboard Shortcuts

  • Belen 4:41 am on March 4, 2020 Permalink  

    Generating charts using Image-Charts and QuickChart 

    As we have shown in previous posts, you can use the keyword *chart to dynamically generate charts inside your GuidedTrack program. There are currently three types of charts you can create: bar, scatter and line. On those occasions when *chart doesn’t meet your needs, you may find Image-Charts or QuickCharts useful.

    Image-Charts is quite easy to use! All you need to do is generate a URL with parameters that contain the information about the chart that you want. You can then use this URL as an image to display:

    *image: https://image-charts.com/chart?chs=700x190&chd=t:60,40&cht=p3&chl=Hello%7CWorld

    Some basic parameters in Image-Charts are:

    • cht: Used to indicate the type of chart to display. The types currently offered are bar, line, pie, polar, radar and bubble charts as well as QR codes
    • chd: Data points to plot
    • chs: Size (in pixels) of the generated image
    • chl: Labels

    The documentation of the tool is very easy to follow and there are plenty of examples. They also provide a form that you can use to generate the URL.

    We have created a sample program so that you can see how it works. It uses data gathered from a brief questionnaire and displays three cool graphs:

    You can look at the code of the program here.

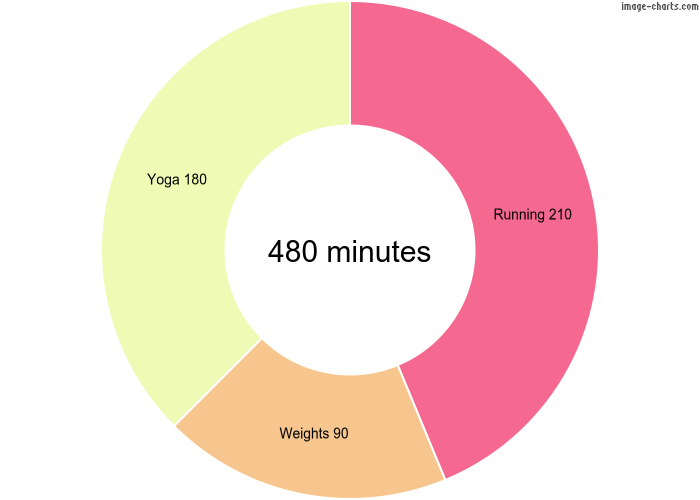
    Let’s examine the code that generates the doughnut chart:

    Here we have first created variables that are set to the values of the parameters that will be sent in the URL, which makes our code easier to read and debug:

    • Chart type: “pd” (pie doughnut)
    • Data points: The minutes the user spent running, doing weights and doing yoga last week
    • Image size: Entered in pixels
    • Legend and labels: These parameters are used in different ways depending on the chart type, so refer to the documentation or the URL generator if you need help defining your own

    We then build the URL and it is ready to display!

    When generating charts with QuickCharts, we also use a URL but in this case it looks like this:

    *image: https://quickchart.io/chart?bkg=white&w=500&h=300&c={type:'bar',data:{labels:[2012,2013,2014,2015,2016],datasets:[{label:'Countries%20Visited',data:[4,7,2,5,8]}]}}

    The base url is https://quickchart.io/chart and in the example shown we are setting 4 parameters:

    • bkg: background color
    • w: width
    • h: height
    • c: a chart.js object with all the data needed to plot the chart

    QuickCharts has a lot more types of graphs and options than Image-Charts so building the chart.js object may get complicated. There is a sandbox on their website with a sample object that you can modify to generate your own. When you are done, you will need to URL-encode it to pass it as parameter “c”. Refer to the documentation to see all the types of graphs available and the different options.

    Below is the code we have created to depict the exponential growth of a colony of rabbits using a logarithmic scale:

    *image: https://quickchart.io/chart?bkg=white&c={type:'line',data:{labels:[2012,2013,2014,2015,2016],datasets:[{label:'Rabbits',data:[98,212,510,739,1434]}]},options:{scales:{yAxes:[{id:'first-y-axis',type:'logarithmic'}]}}}

    And this is the resulting image:

     
  • Peter Moorhead 3:12 pm on February 7, 2020 Permalink  

    How to Embed GuidedTrack Programs in WordPress 

    Embedding GuidedTrack programs in WordPress is super quick and easy.

    First of all, you’ll want to install a simple WordPress plugin that adds a standard shortcode for iframes. We recommend this one: https://wordpress.org/plugins/iframe/

    This plugin will allow you to directly embed all kinds of iframe content, such as YouTube videos or HTML5 games, but it works great for GuidedTrack programs. Note that unless you have a premium WordPress account, or host your own WordPress site, it may not be possible to install plugins like this one.

    Using the following example code, you can embed your own program:

    iframe src="http://www.guidedtrack.com/programs/YourProgramID/run" width="100%" height="600px"

    (To have WordPress register it as a shortcode, place square [ ] brackets around it)

    Finally, you’ll need to whitelist the URL of the blog post in your GT program’s share menu. To do this, open your program in the GT editor and click Share > Embed, add the URL of the blog post to the list at the bottom (for example http://blog.guidedtrack.com/?p=273), and click Submit.

    That’s all there is to it!

    Here’s an example where we embed a GuidedTrack program in this post:

     
  • Belen 5:18 am on January 10, 2020 Permalink  

    Feature update – new syntax for *wait, custom events 

    Here’s what’s new:

    *wait syntax update

    We have updated the way you tell GuidedTrack how long to *wait. This change will not make your running programs break, but if you edit a program that contains this keyword you will get an error message prompting you to use the new syntax. 

    In the example below, the program waits 4 seconds before displaying the button:  

    Basically, now there is a period between the number and the word “seconds” or “minutes”. The changes we have made now allow you to:

    WAIT A FRACTION OF A SECOND
    Do you want your program to display an image exactly for 0.7 seconds? Just enter it!

    USE VARIABLES TO SPECIFY DELAYS
    You do not need to set the wait time when writing your program, it can be generated at runtime. In the example below, the user enters the number of seconds to wait:

    WAIT A COMBINATION OF MINUTES AND SECONDS
    If you know how many minutes and seconds you want your program to wait, you can do the conversion to seconds or skip it and write it this way:
    *wait: 2.minutes + 4.seconds

    WAIT FOREVER
    This is especially useful when your program has navigational elements other than questions and buttons – i.e. when you are using the keyword *navigation or clickable *components.  Using *wait without any duration will stop the navigation indefinitely (without ending the run of the program) until a navigation element or *component is clicked. See the syntax below:

    This is how this program looks, and this is what it looks like without *wait.

    Custom events

    We introduced the keyword *events with the attribute *startup to have your GuidedTrack program do something every time that a user returns to it. Now we have enhanced its functionality so that you can trigger custom events using JavaScript. This is a super powerful tool that allows you to control the program navigation using events and even send data from JavaScript to GuidedTrack. 

    This feature is only for when embedding your program on a website and you will need to have a working knowledge of HTML and JavaScript.

    Here is a simple program that uses custom events:

    The program above has an event called “loadFinalPage”. In order to trigger this event, you would have a script in the page where the program is embedded that would look like this:

    jQuery(window).trigger(‘loadFinalPage’, {“message”:”going to final page”, “message2″:”because a button was clicked”})

    Note that the event’s name in the JavaScript code matches the name in your program!

    When the JavaScript event occurs, the GuidedTrack code under the event runs immediately. See also how the JavaScript code passes an array of data that gets stored in the association it so that you can read this data from within the program. So, if the event loadFinalPage is triggered as shown above, the sample program will display message1 and message2 and then go to the label final_page no matter where the navigation was at that point.

    Also, know that your program can have different events, you just need to create them as shown above.

     
c
compose new post
j
next post/next comment
k
previous post/previous comment
r
reply
e
edit
o
show/hide comments
t
go to top
l
go to login
h
show/hide help
shift + esc
cancel